Fulfillments
Fulfillments area in BOTSchool is where the user configured the API’s and Storage Buckets to use in the Intent Programs.
Table of Contents
Fulfillment APIs
BOTSchool is able to interact with external RESTful APIs for the purposes of fulfilling customer requests.
Fulfillment APIs can be used bidirectionally, to retrieve information from external systems, or to submit orders in external systems, all from within the context of a Program.
BOTSchool’s User Interface allows a “codeless” way to test and to configure the use of such APIs.
Adding a Fulfillment API
To add an API select the Fulfillment option in the left menu of the screen.
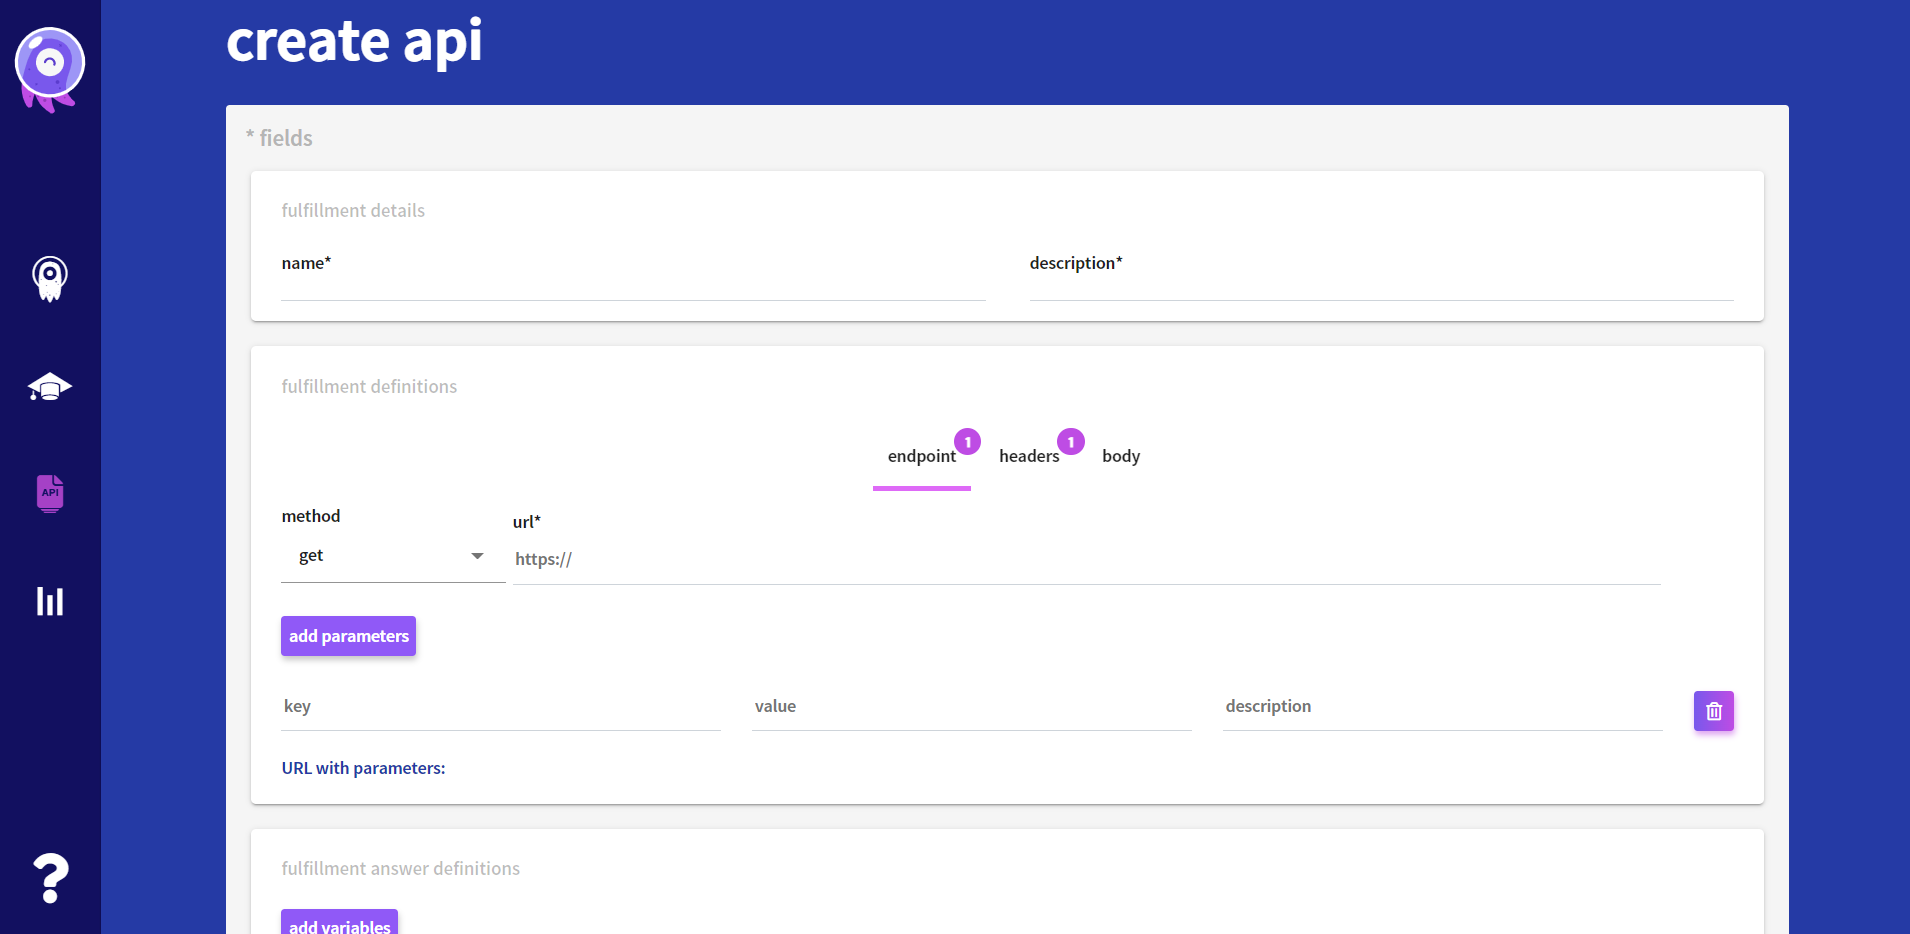
For the purpose of this tutorial let’s add a weather query API. We will use https://openweathermap.org API. Please refer to their website for further information on API documentation and usage.
Configuring the API request
To use this API, start by selecting the method and filling in the base URL.
![]()
This API uses URL parameters to pass information. To define parameters, add them with the add parameters button and fill in the key and value fields.
For this demo we added the following parameters with corresponding key and value.
- mode - json
- lang - en
- units - metric
- APPID - yourAPPID
- q - ${city}
The configuration parameters should look like this:
![]()
Notice how the request URL is being built automatically based on the parameters provided.
A few explanations on some parameters is however necessary.
The value yourAPPID must be replaced by the APPID you must obtain from https://openweathermap.org.
The value ${city} is a way we have to tell BOTSchool, that this API needs a variable with the name city to be used correctly. When using the API in a Program, the interface will request that this variable be filled.
Getting information from API response
It is now necessary to prepare this Fulfillment interface to parse / analyze the API answers, so this information may be used by a Bot Student.
In the request, a JSON file response was requested. JSON files can be interpreted as trees of information, with a root, and descending branches.
At the BOTSchool Fulfillments page, the root element is designated list, and it is a vector, as multiple files could be returned in a response.
Since in this API we only care about the latest information, the first element in the list is the one we want to use. That information will be placed in the list[0] element.
A sample of the API JSON response can be viewed in the following page: https://openweathermap.org/current#current_JSON
A snippet of the response is provided here as reference:
{
  "weather": [
    {
      "id": 800,
      "main": "Clear",
      "description": "clear sky",
      "icon": "01d"
    }
  ],
  "base": "stations",
  "main": {
    "temp": 20.71,
    "pressure": 1013,
    "humidity": 53,
    "temp_min": 18.82,
    "temp_max": 22.71
  },

  "id": 420006353,
  "name": "Mountain View",
  "cod": 200
}
From the JSON file, it becomes apparent that the relevant information needed is in the weather element, namely its description, and the main element that holds temperature information.
To get to the weather description it is necessary to give the full path while looking down from the root element using dots . as stepping stones.
Starting at the list[0], looking into weather, and into description becomes $.list[0].weather[0].description
Add Fulfillment Answer Variables by pressing the add variables option like presented in the screenshot, to obtain the weather description, temperature, minimum temperature, maximum temperature and returned code.
Press save to save the API.
![]()
You have defined the weather API that returns the information for a specific city in any location.
Preview APIs details
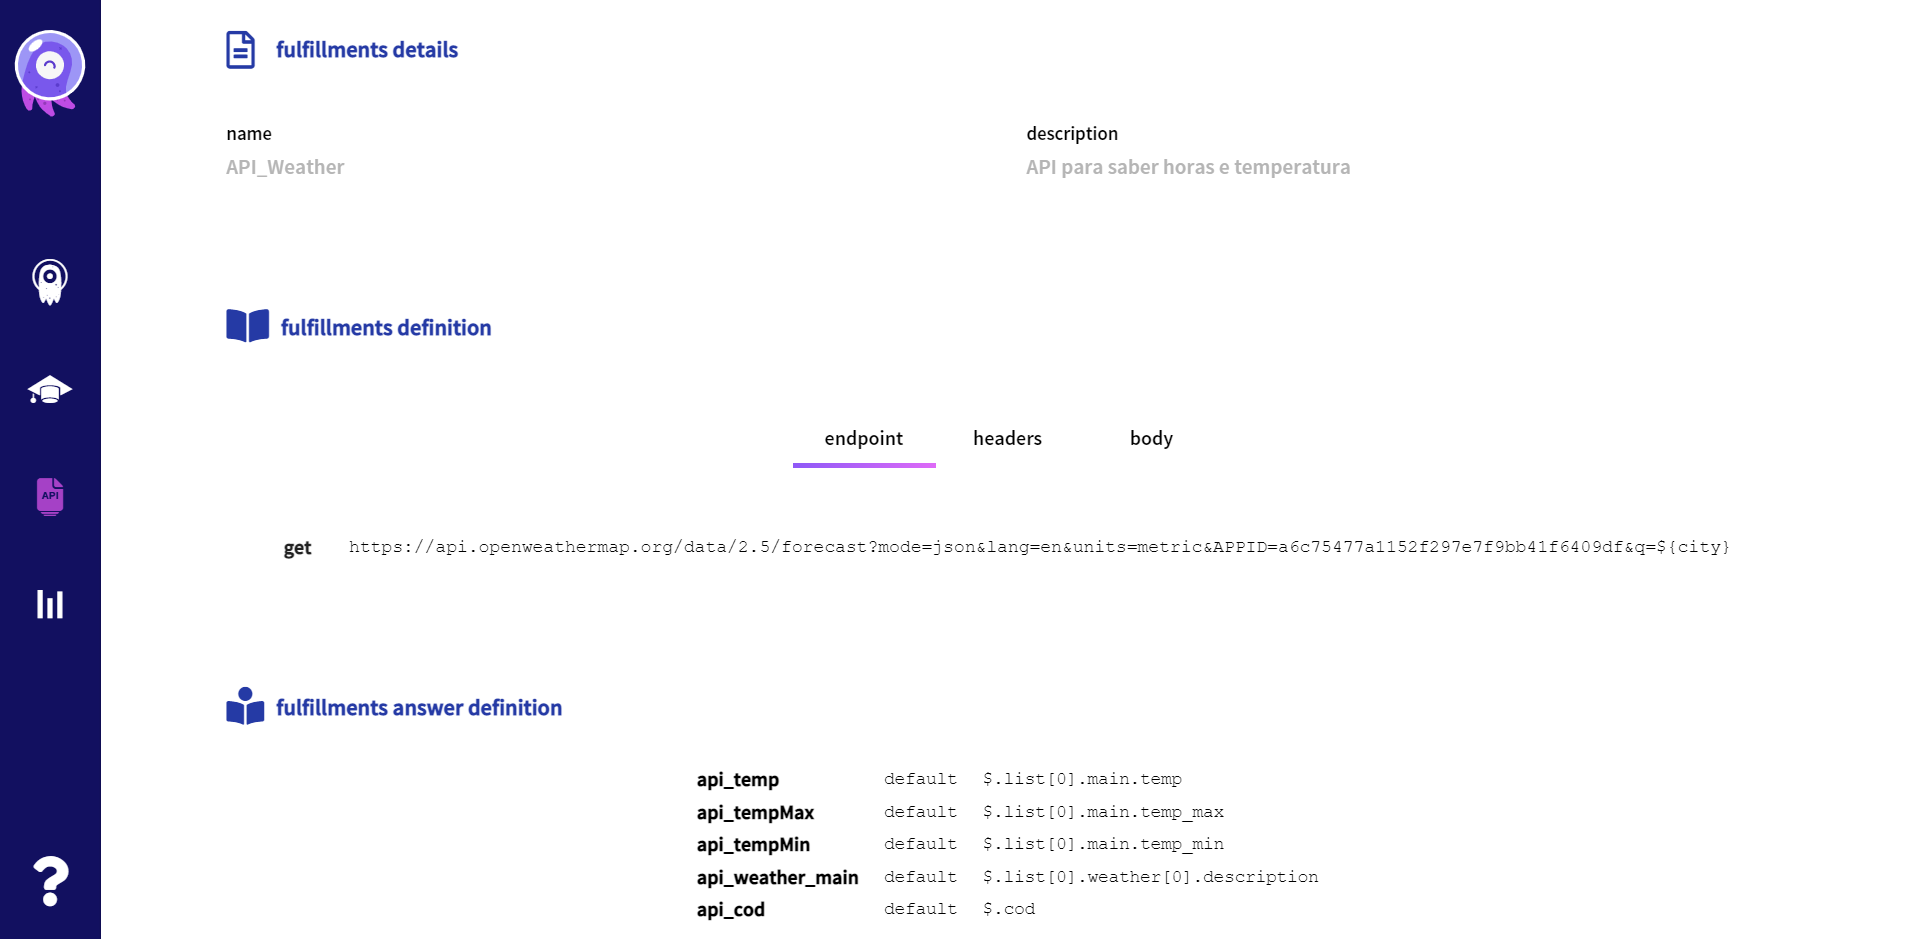
After selecting an API, you are able to see the detais of your API in the tab details.
Test APIs
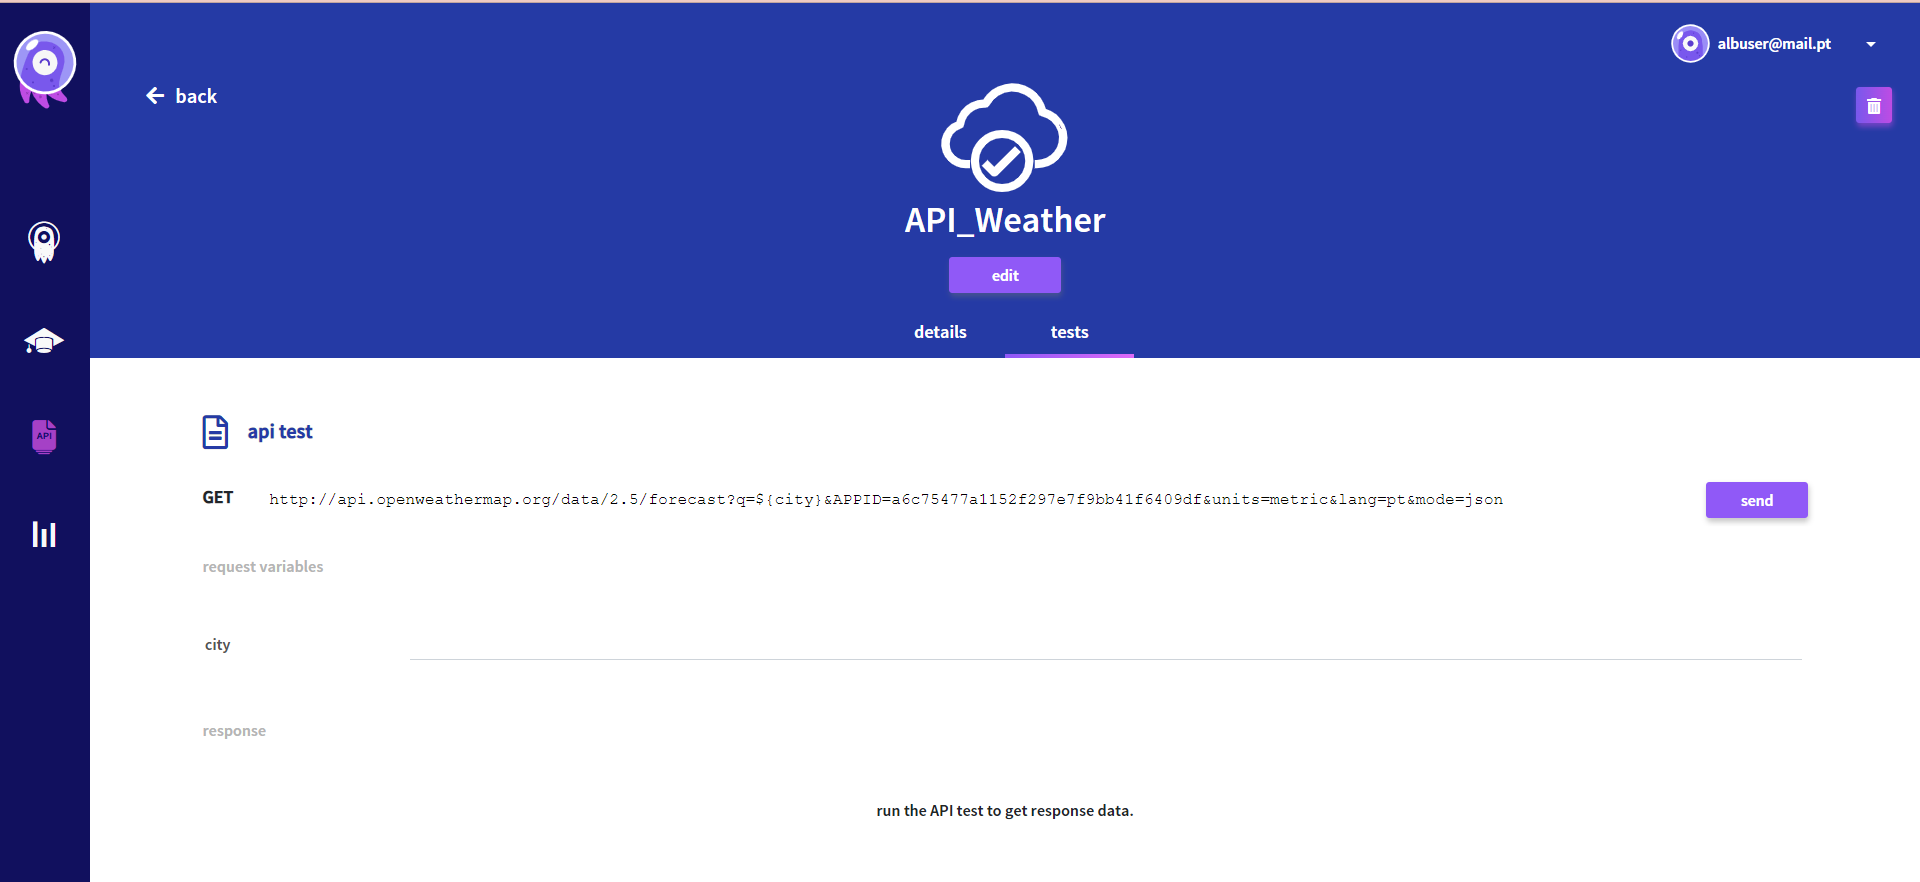
You can also test your API in the tab test, where you can run the API test to get response data.
You just need to fill the request variables and click send.
The next step is to learn how to use the API’s returned information in a Program.
Use APIs in Programs
With the API created it is now possible to use it in a Program.
In the program content, Designer Flow tab, on the bottom left are all the APIs defined in your school, identified by name and visually shown as a “cloud” icon.
During a conversation (defined on the Designer Flow), sometimes it is needed to get information from an external system, or to post something that the end user says to the external system. Both situations can be accomplished using APIs.
With the API created on the BOTSchool’s fulfillment area, in the Program’s Designer Flow, when you drag one API to the canvas area, it means that on that point of the flow the API will be called. The API shape configuration will be shown, and you identify the input parameters when calling it, and also identify the output parameters that you want to use on Dialog Flow.
Let’s create a program that uses the Weather API.
- Create a new program: Weather.
- Access the Designer Flow area.
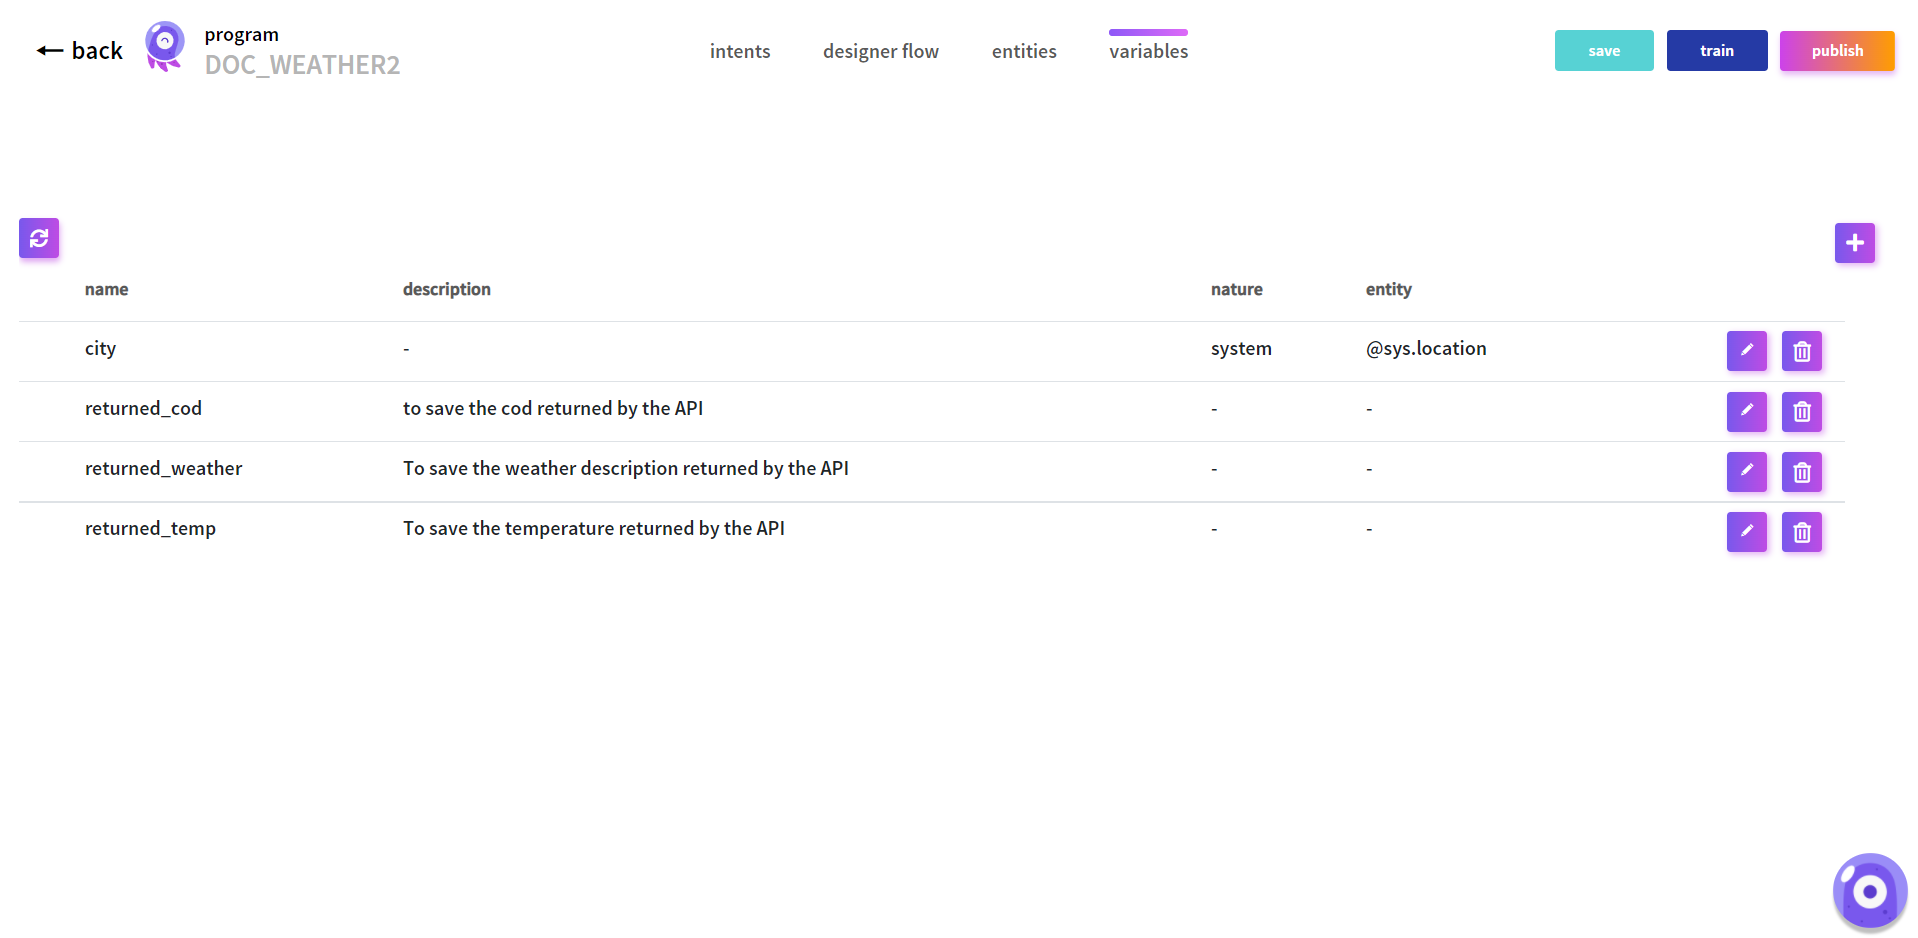
- In the Variables tab: create a variable city related to the system Entity location.
- In the Intents tab: create the intent that identifies a weather question for a location. As the location will be any place the user says, we will use the variable city created to represent the location where the user wants to know how the weather is.
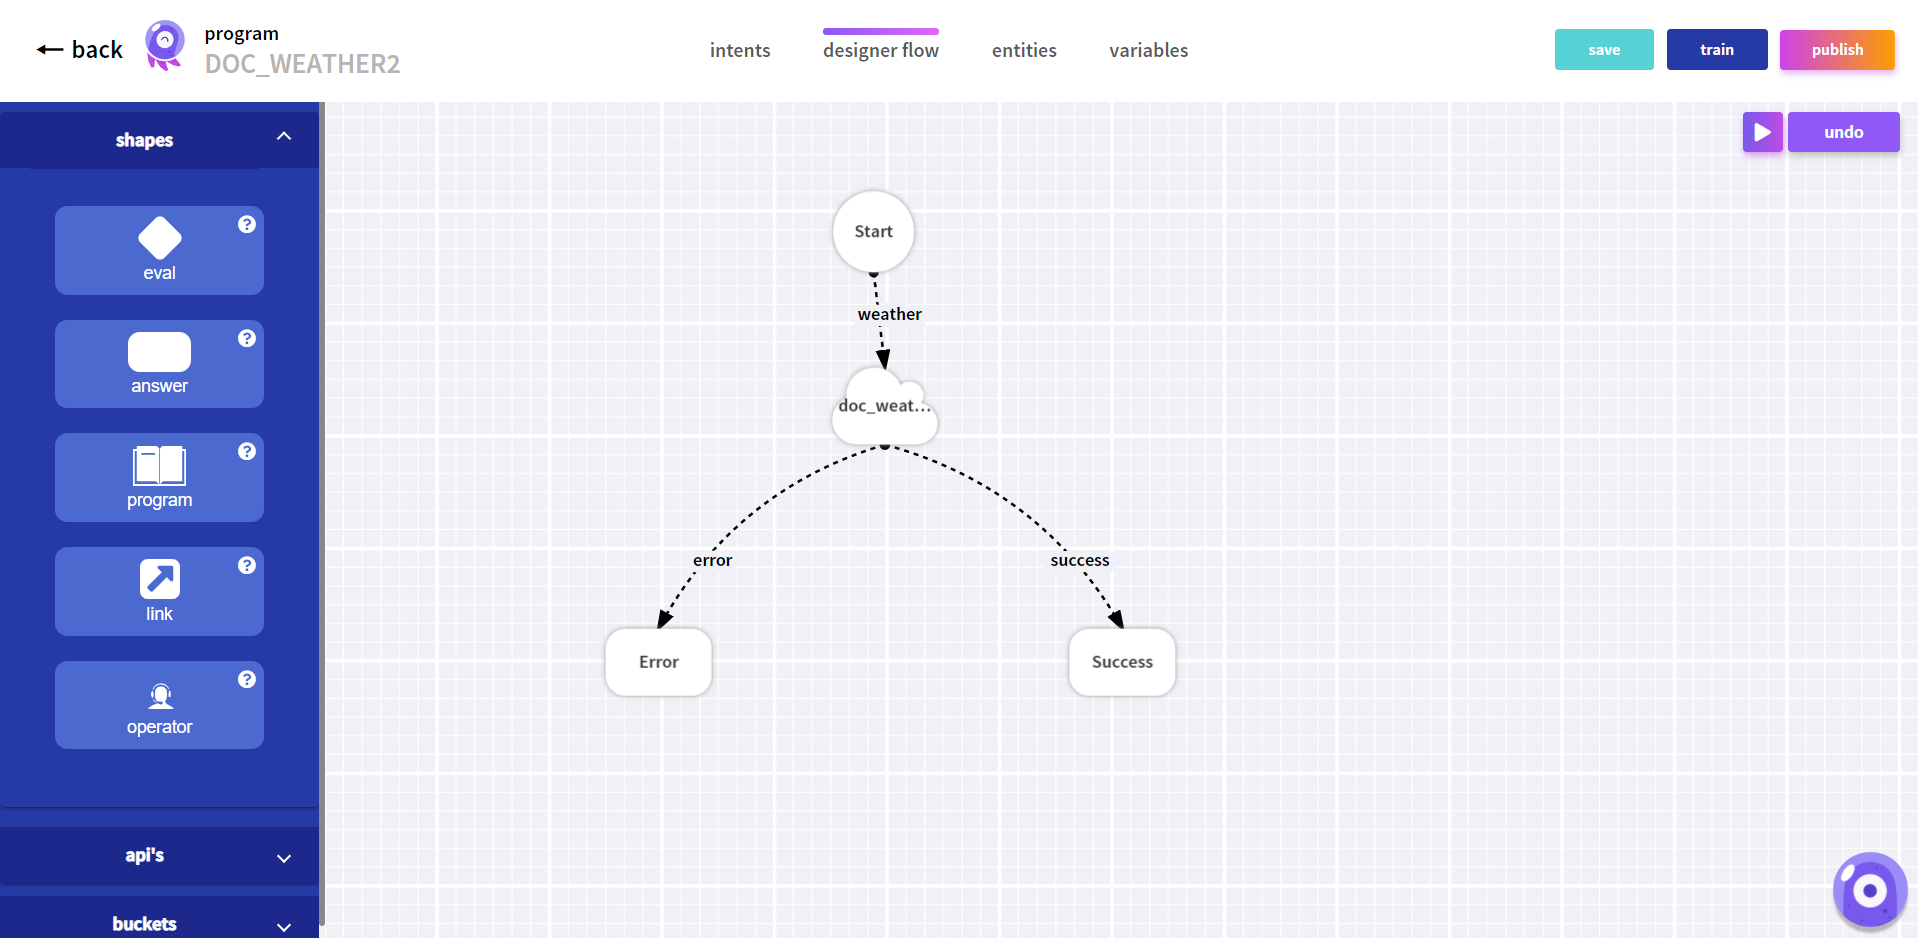
- In the Designer Flow tab: the APIs you have created are shown on the left side down of the Designer flow section. Select the Weather API and Drag it to the canvas area, and connect to Start node.
- Now that you have all the conditions set, let's define the Answer to this weather API request. Drag an Answer shape to the canvas and connect it with the API shape you have already included. On the connection you should define the condition that makes this connection true. In this situation is when the API returns the result field "cod = 200":
- Now you should define the text answer for the success result.
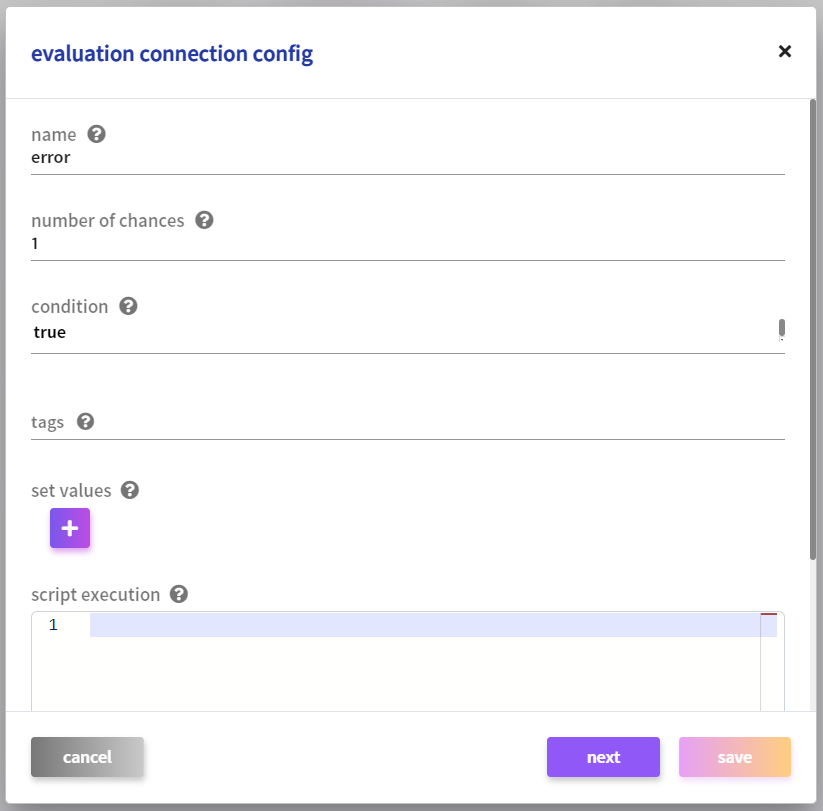
- It will be nice to also send to the end user an answer in case the API result code is unsuccessful. To do this, you should repeat the previous steps. Having done that:
- Now for Answer error shape you should define the text to send to the user when the API result is unsuccessful.
Also create Variables to save the output parameters from the API (returned_cod, returned_weather and returned_temp)
Example traning phrase for the intent: "How is the weather in city | @sys.location
Access the API configuration shape (double click on it) and define the input parameter to call the API, on this case the variable city that contains the location the user says in the sentence.
For the output fields, save them in the variables created (returned_cod, returned_weather and returned_temp), which will then hold the information the API returned: the API result code, the weather description and the weather max temperature.
Condition: returned_cod==="200"
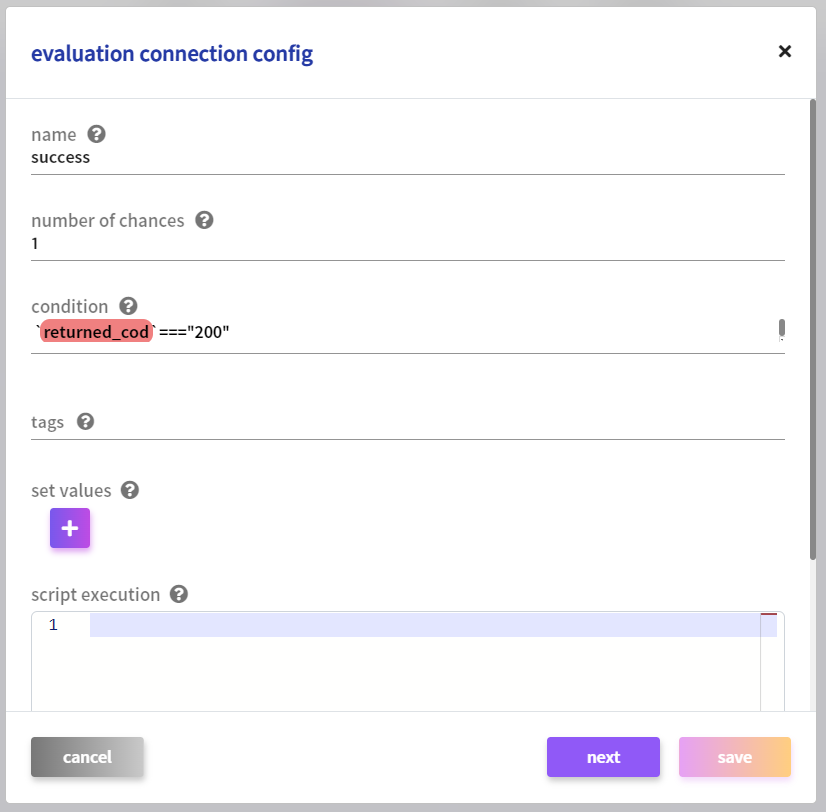 |
After pressing Next, set this connection as the first one that should be validated.
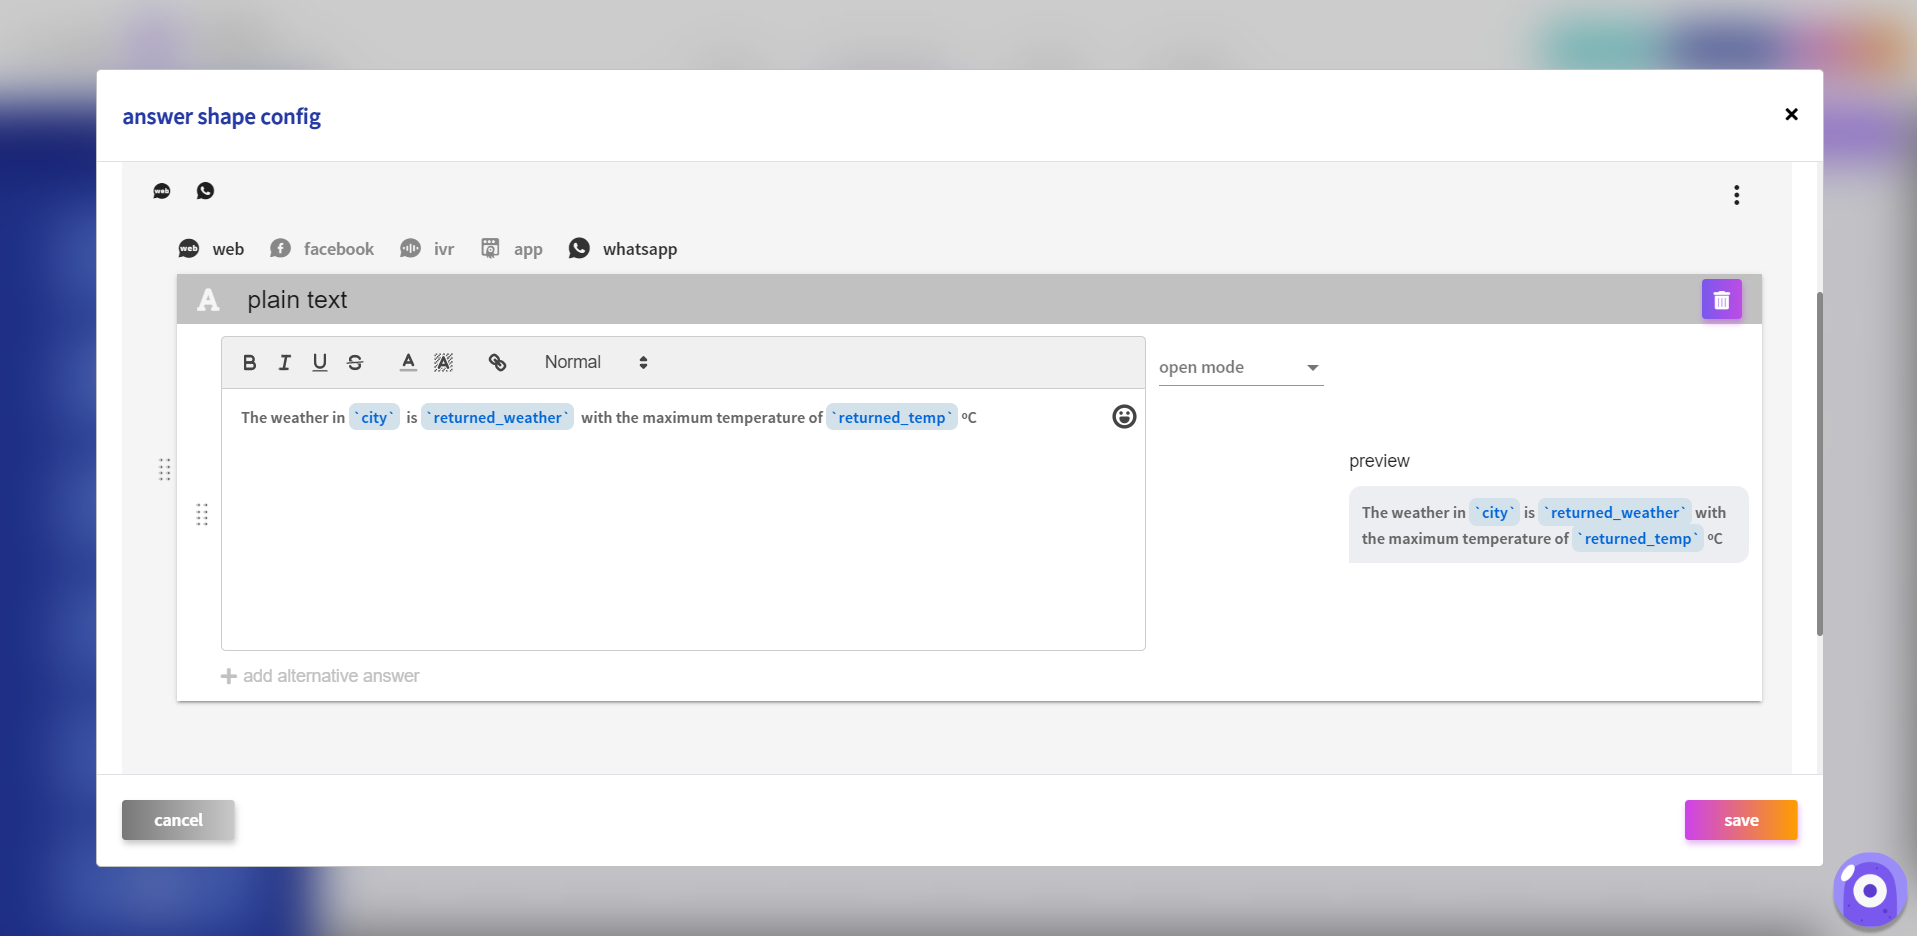
Name this Answer Success.
Define the Answer on “Plain text” with the text:
The weather in city is returned_weather with maximum temperature of returned_temp degrees.
Since this answer should always be sent if the result code is unsuccessful, the condition will be True.
Condition: True
 |
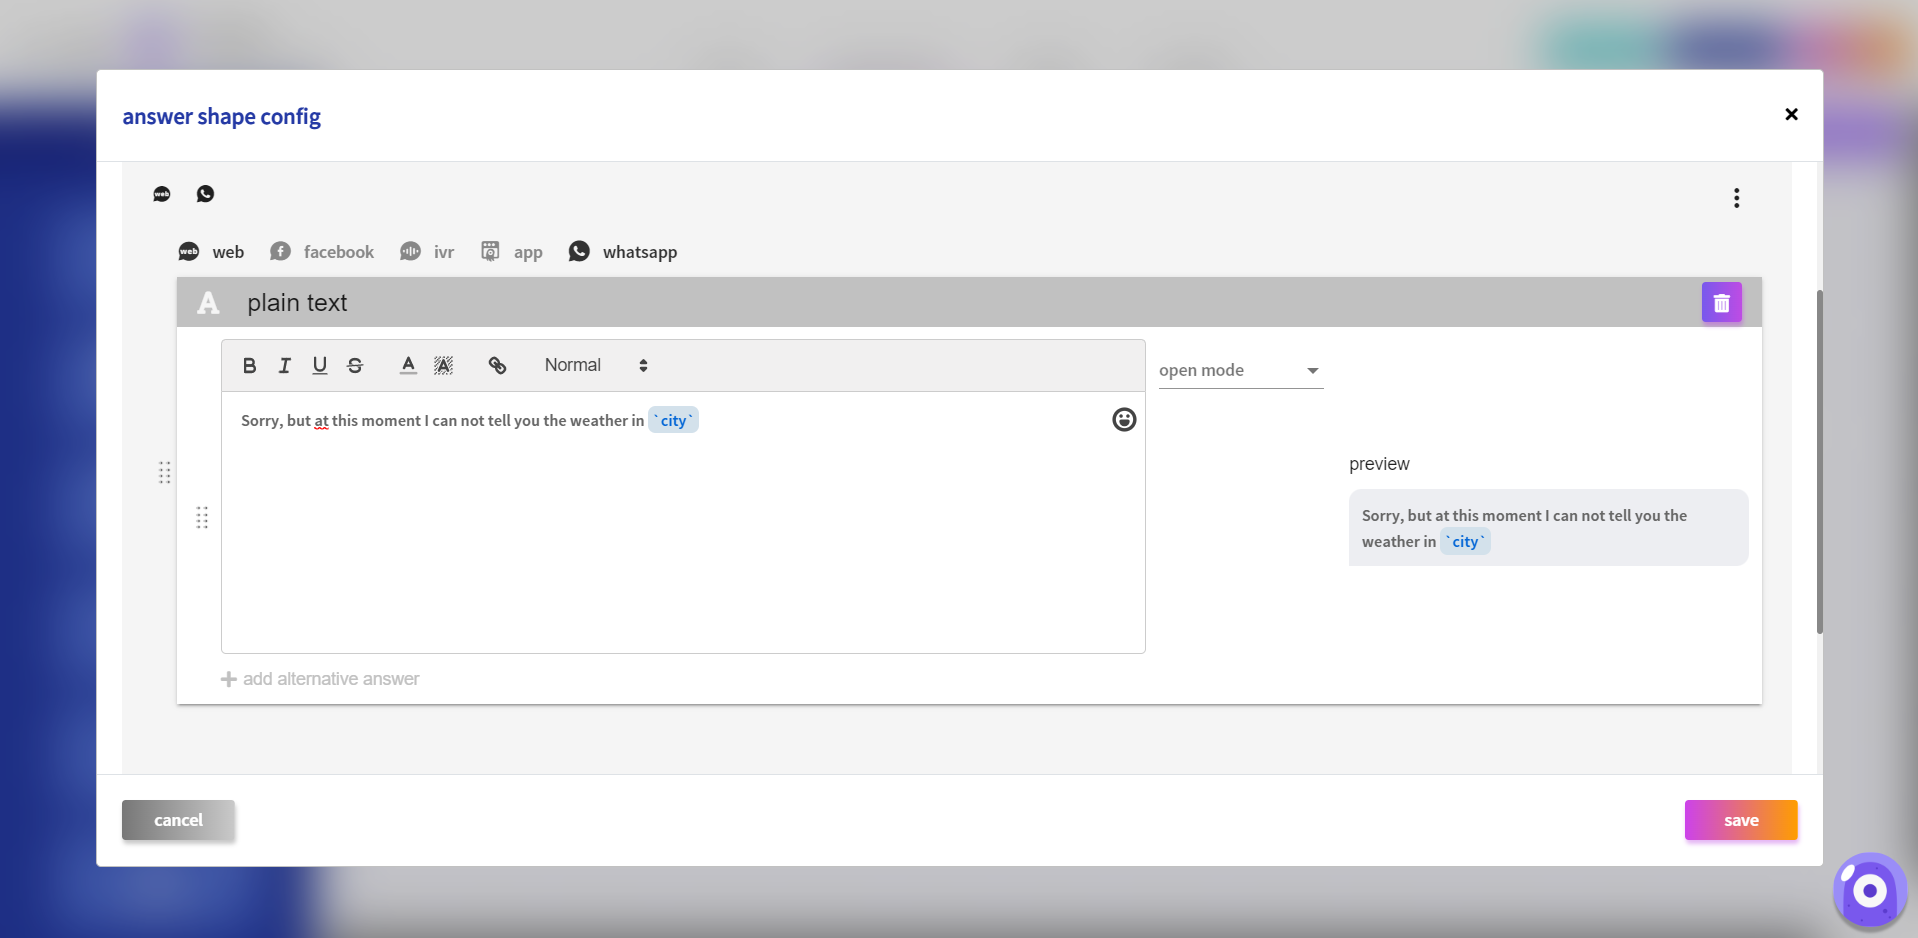
Example: Sorry, but at this moment I can not tell you about the weather in city.
Fulfillment Storage Buckets
Storage Buckets are a way of storing / saving information retrieved during the conversation. This information will be stored in BOTSchool’s database, and will be available to external systems. What is stored is up to the user: the user configures which “keys” he wants to store, and during the conversation “values” will be set to these keys, grouped by the session identification. Each conversation with an end user has a different session identification.
Adding a Storage Bucket
To create a new Storage Bucket, navigate to the Fulfillment area of BOTSchool, select the Bucket tab, and click the + card.´
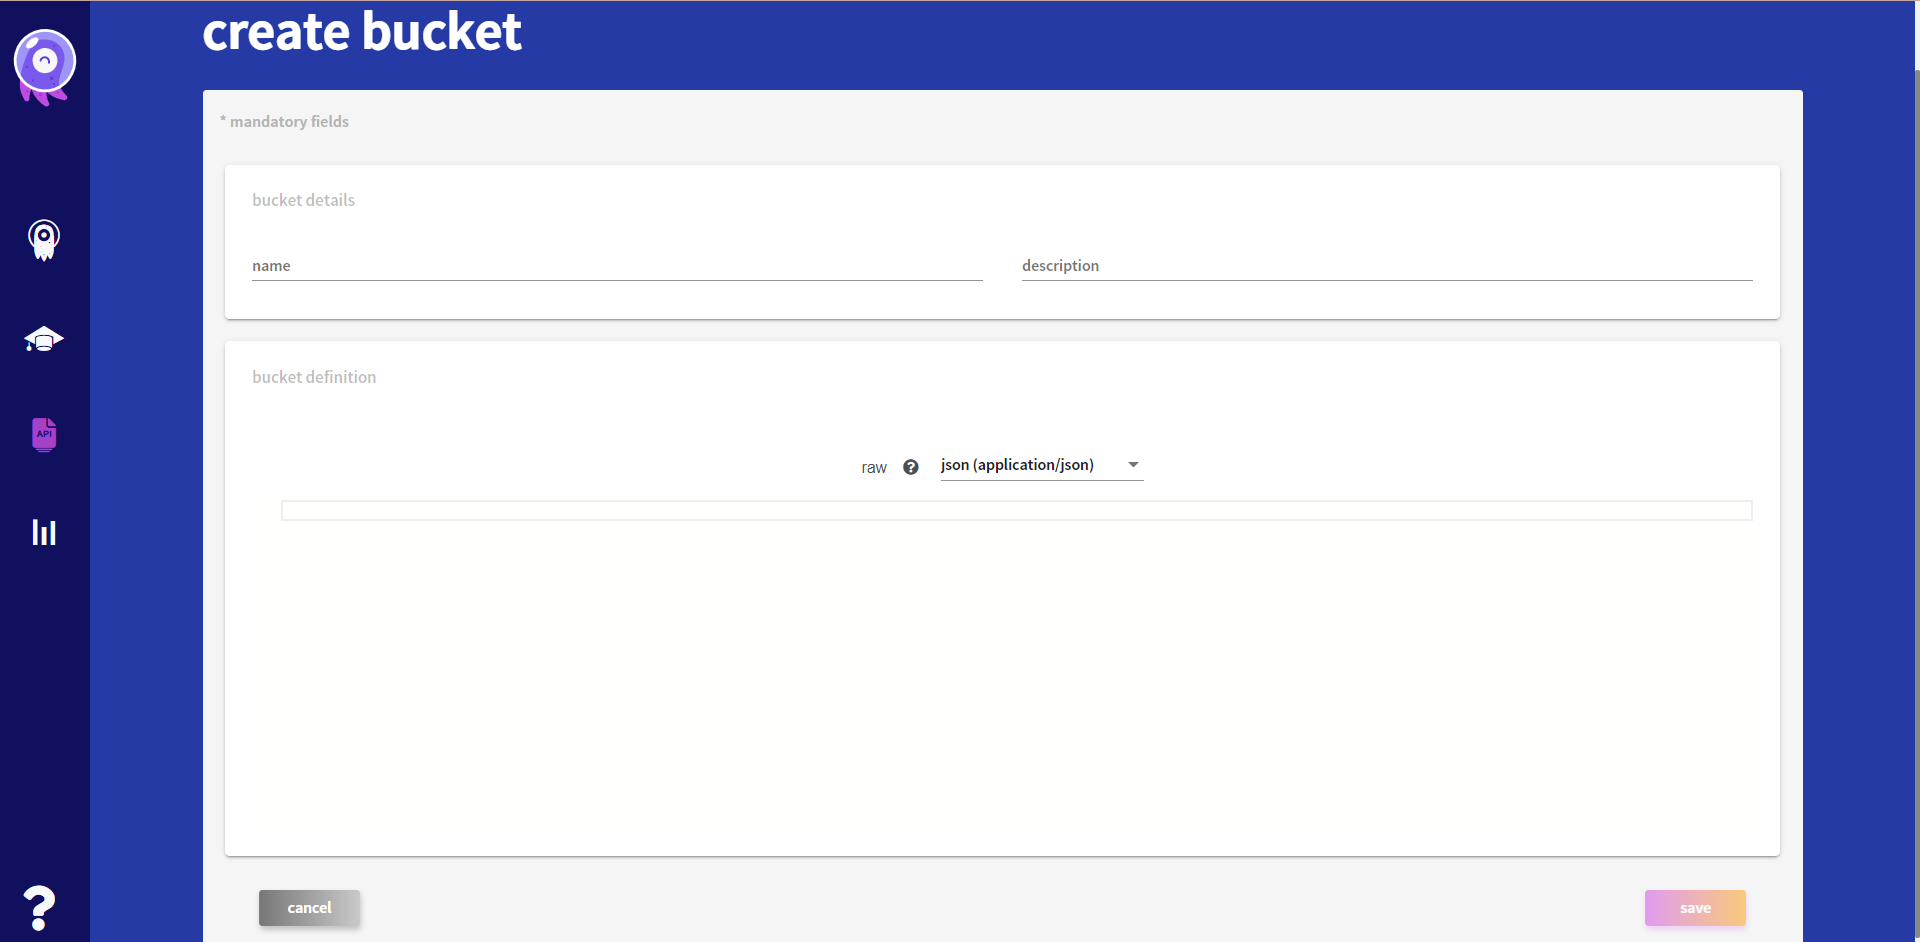
You must fill this following form in order to create your Bucket.
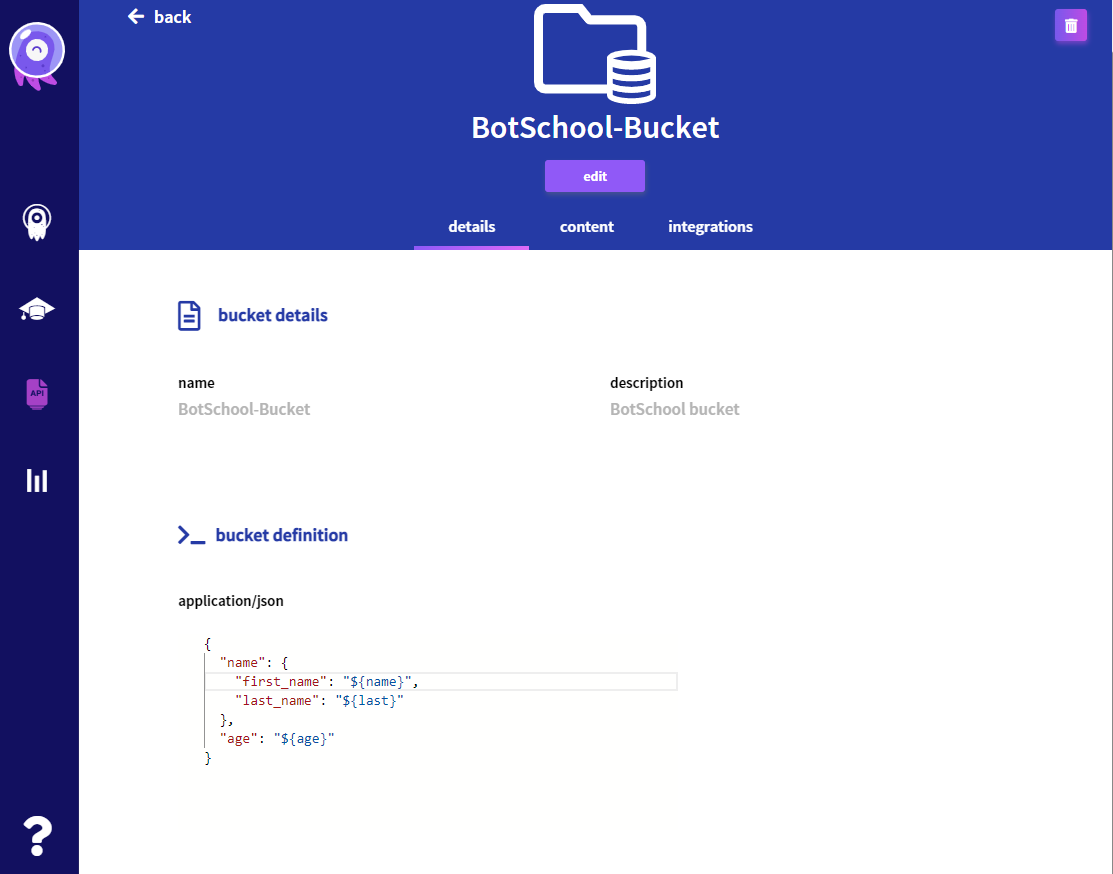
You can see the details of your Bucket and edit it if you need to.
If you want to see the usage of your Bucket, content tab allows you to consult and filter your data.
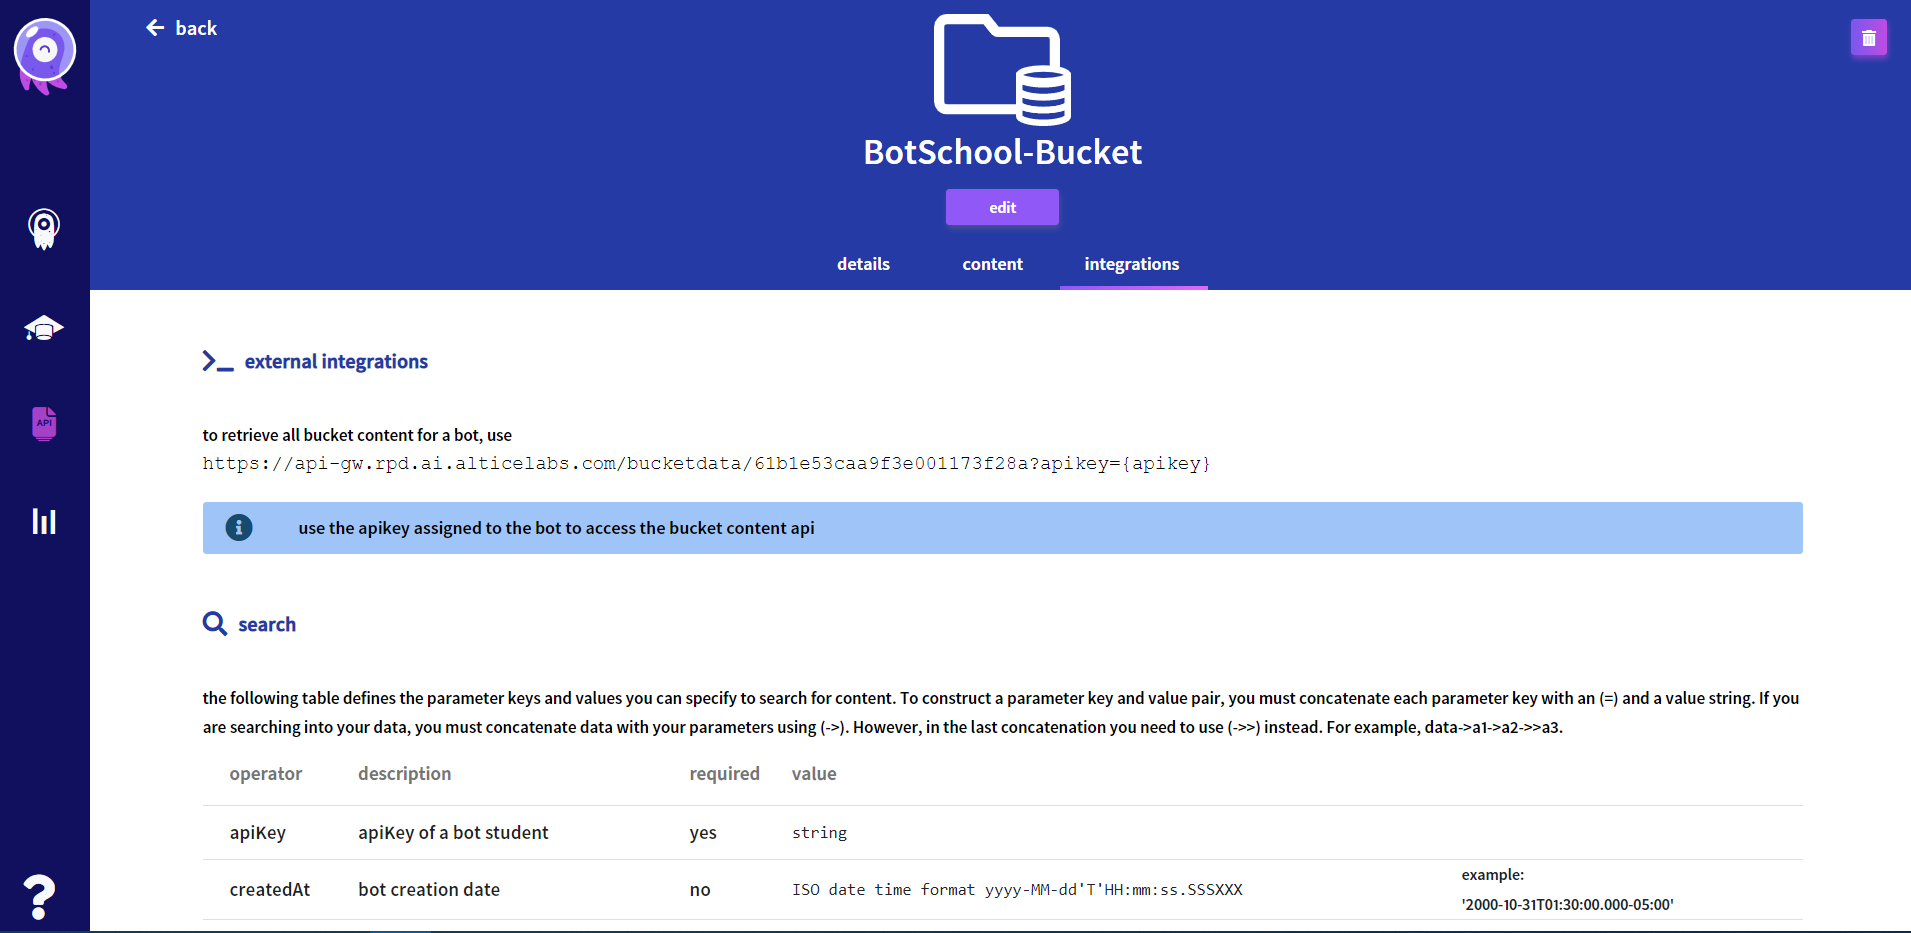
For external integrations, you can check the integrations tab where you can find some documentacion from your API that can be useful.
Using Storage Buckets in Programs
Insert
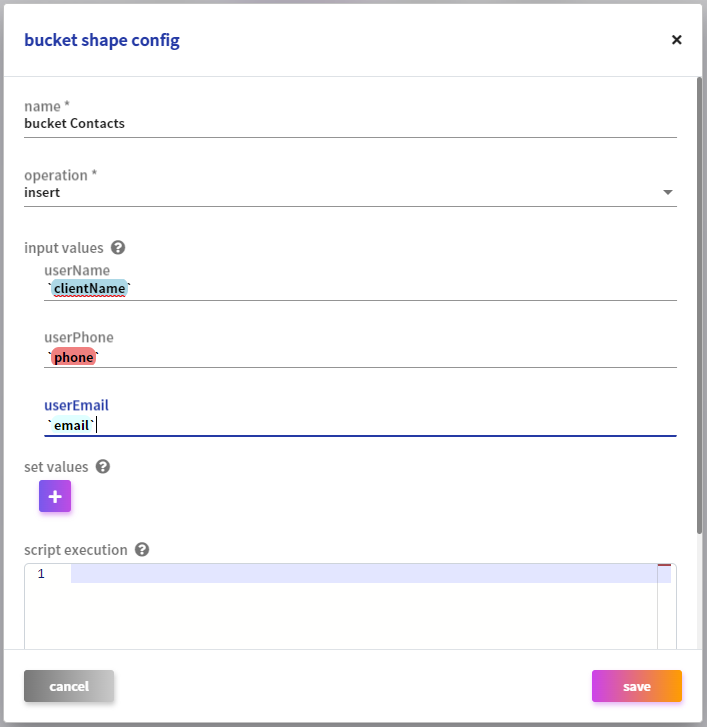
To use a Storage Bucket in an Intent Program, you must select an existing Bucket (presented in a Shape) and drop it to the Designer Flow canvas.
First of all, you must add information in your Bucket. You can do it by adding in the bucket keys the values stored in the Programs Variables.
 |
Read
Later in the conversational flow you might want to consult data previously stored in the bucket. To do so, you use the Read operation. You can search for the needed information by the last inserted bucket or by a custom query.
In the following screenshot, it is shown a Read operation, searching by a custom query, that will retrieve values matching the value of a variable (lines in the bucket that match the value of the variable phone, in the phone key of the bucket).
The query will return information from the selected bucket (if available). In the example, the returned data in the first line ($.[0].data) is set to a Program variable called bucket-raw-data.
If you choose to search by the last inserted bucket, it would retrieve information related to the last insertion of a given bucket.
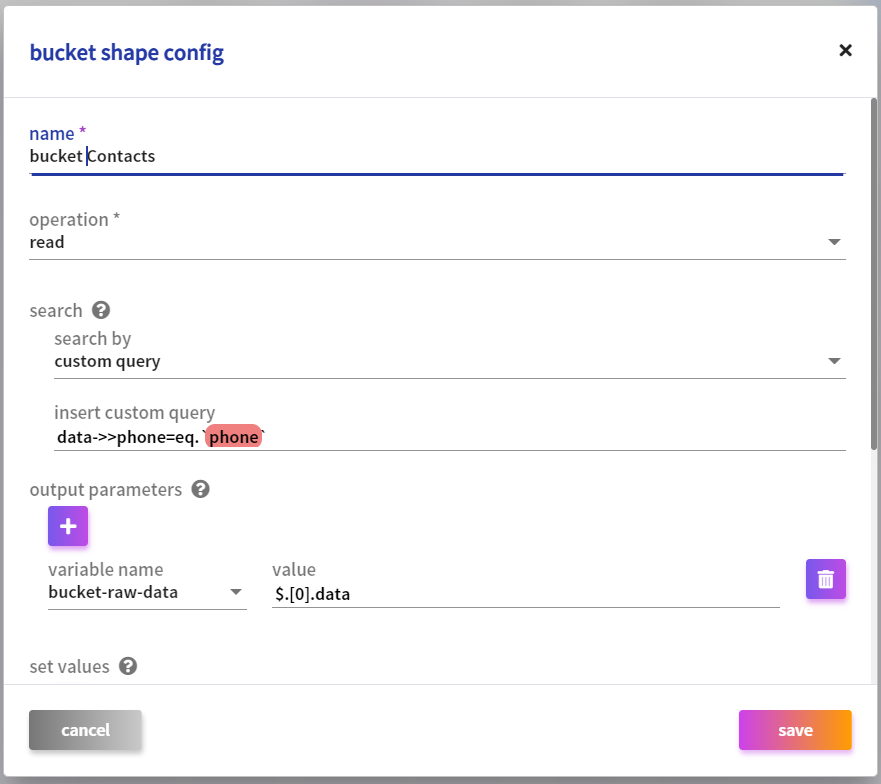 |
From that moment, the Program variable bucket-raw-data has the value returned from the bucket - either that, or it is null.
Update
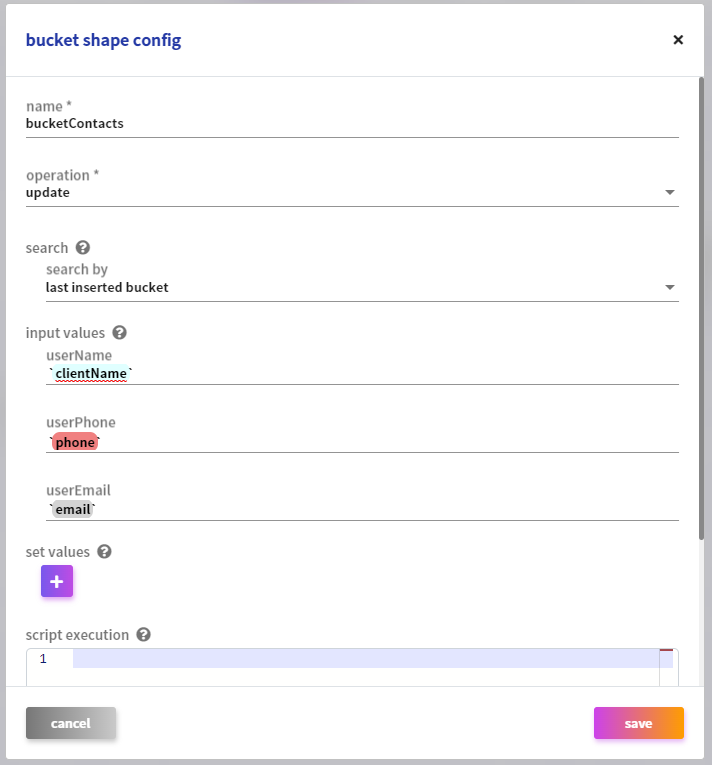
It is also possible to Update an existing bucket with new information. As in Read operation, Update enables update by last inserted bucket or by a custom query.
In the following screenshot, that will edit the values of the bucket with matching last inserted bucket.
 |
In the following screenshot, it is shown an Update operation, executed by a custom query, that will update values matching the value of a variable. In this particular case, the custom query includes a custom program variable, which is set equal to the session.lastCreatedBucketInstance.
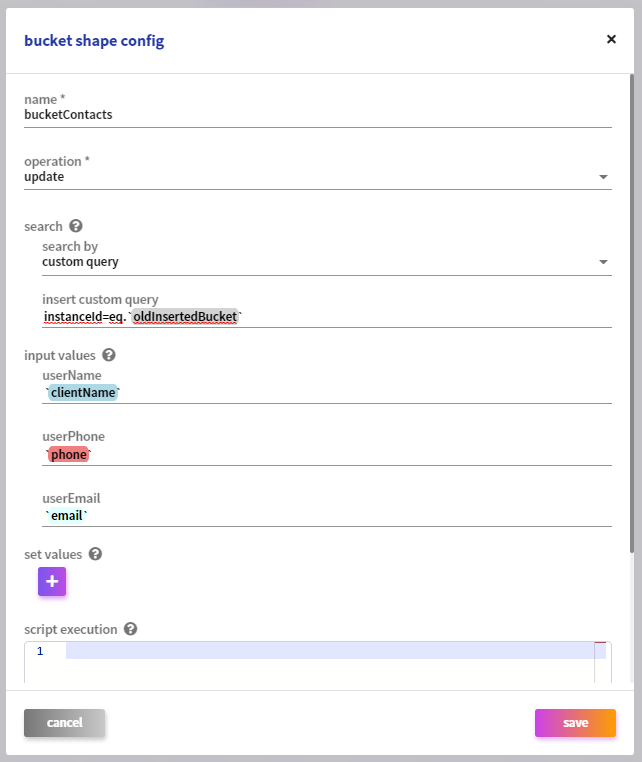 |
Custom variable, must be set in the connection which precedes the bucket intended to be updated.
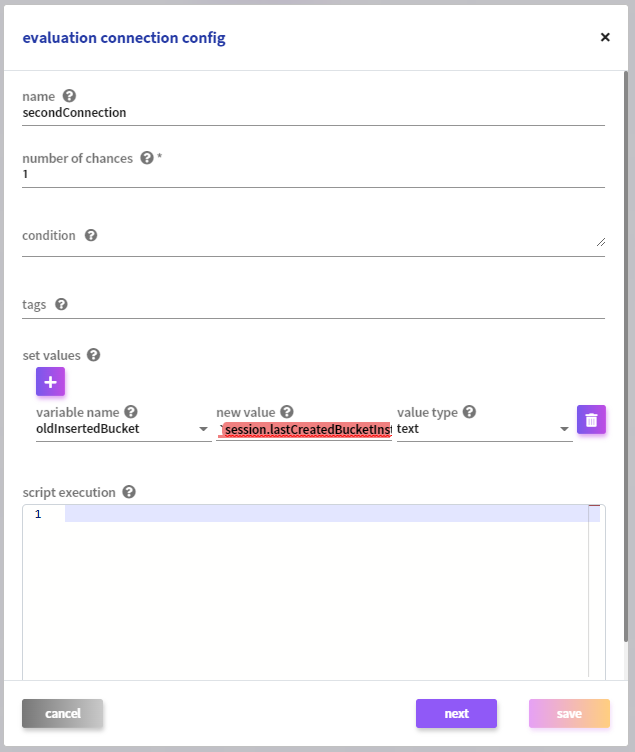 |
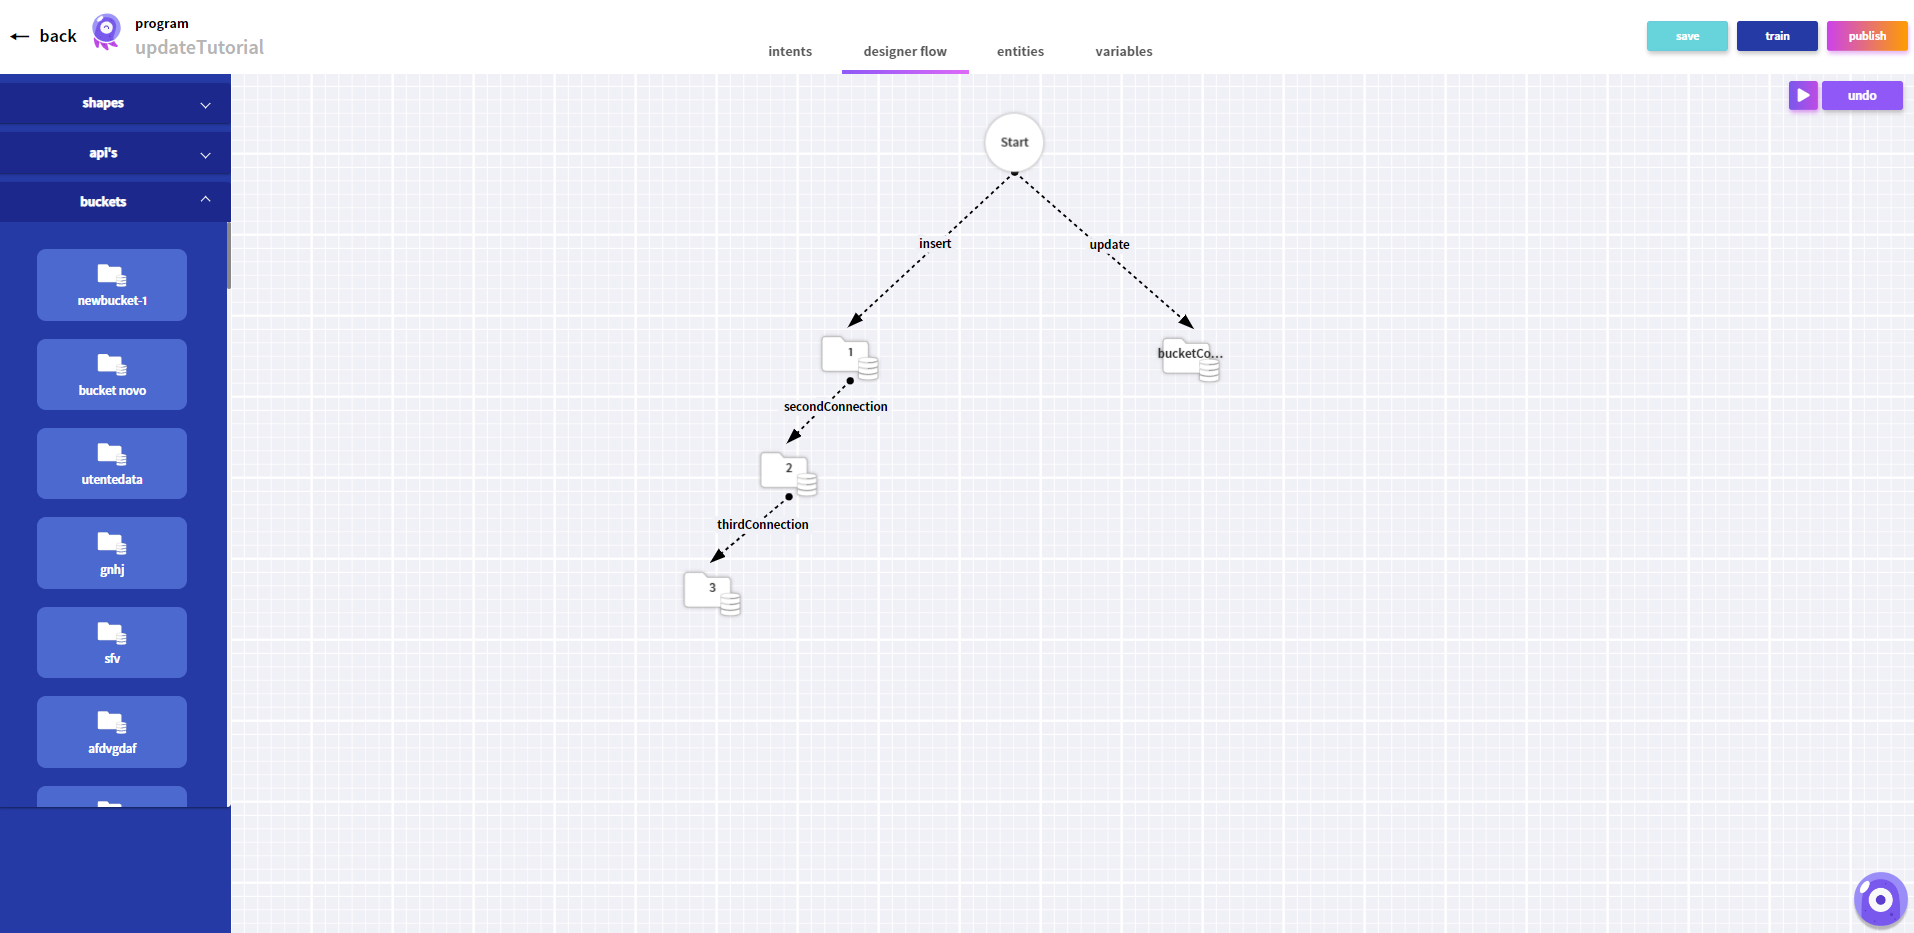
So, as you can see in the following program example, with custom variable being set in the secondConnection, proceeding with the update operation, the values in the bucket number two will be updated.
For more information about custom queries consult the following documentation: https://postgrest.org/en/stable/api.html#insertions